
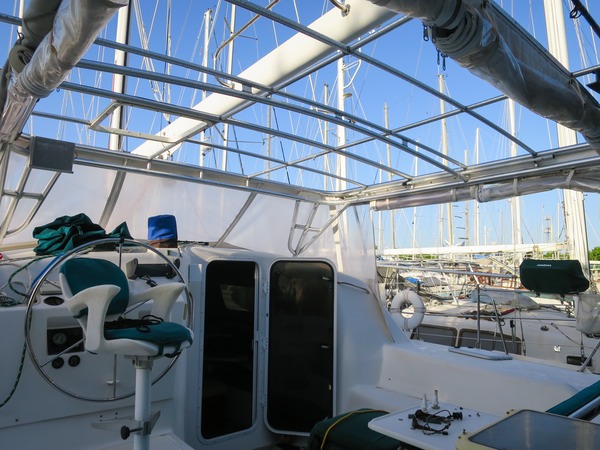
Reach has gone through two soft-top covers for the cockpit over the last 18 years. These are used for sun and weather protection in the cockpit, fitted over a substantial aluminum dodger, bimini and davit arch. This metal structure is a defining feature of Manta catamarans. One of our shared memories is the time I first saw a Manta during a sail on our classic sloop Echo (Columbia 40) in New England; aesthetically, I wasn’t a fan.
Functionally, it makes perfect sense and has now become my favorite feature on our Manta. Not only does it provide much needed shade at anchor with drop down sunbrella shades to the lifelines for the entire cockpit, but it is strong enough to raise and hold our dinghy securely each night and also protects us as a virtual pilothouse when passage-making. Although we rarely sail with the full enclosure down, we often lower a windward side window at night to get out of the wind or both sides when rain comes.

Over time, we took the soft-top for granted and only when it started wearing thin and leaking did we realize it was time again to replace it. It is made of Weblon vinyl and like most important things boat-wise these only last 8-10 years in this harsh salt and UV environment. Its primary advantage is that it is a light weight solution for a large surface area (12 x 14 foot) high above the waterline. The disadvantage is that you can’t walk on it so the top required an additional (heavy) aluminum plate down the middle for a walk-way around the boom.


The last time Mark replaced the soft-top I thought he’d lose a finger with all of the tightening of the line through seemingly infinite grommets.

We’d always had a permanent solution in the back of our minds, so this time decided to build a hard-top out of fiberglass if we could keep the weight similar.
This was possible since we could also get rid of the aluminum plate.
Armed with ideas and fiberglassing experience, this project still came with many of its own unique hiccups, as they tend to do ~ environmental, technical, health (!) and financial issues were conspiring against us. Our boatyard location in the back row of the yard gets no breeze and is near a swampy low-ground where we have to battle with mosquitos every morning, requiring mosquito sticks and coils. Later in the day, even the mossies go into hiding in the heat when it becomes too hot to work.


In fact, there was a false-start where the first hard-top design was attempted and abandoned to take a more expedient, albeit costlier route. Namely, Mark painstakingly measured and built a precise mold as a lay-up table following the camber of the arch for the top, to be made in three sections.
The first attempt to wax (3x) and lay up gelcoat (3x), woven mat, biaxial fiberglass, divinycell foam core and biaxial fiberglass resulted in a ruined mold and he was not about to repeat that process two more times for the other sections! So, we sucked up that costly mistake ~ that first layup was donated to another cause and is now a stern extension on another catamaran ~ and went back to square one.


Here, we decided to re-start with pre-glassed nidacore sheets made from 1/2” honeycomb core sandwiched in 18 oz. fiberglass cloth and design the hard-top using these. The design would still be made in three sections where each seam would meet over the aluminum structure across a main beam of pipe.

The nidacore came in 4'x8' sheets from Merritt Supply in West Palm Beach, who makes daily deliveries in the Treasure Coast area AND exchanged materials with us when we switched tactics!
Each section also took some glassing to shape into templates for front, middle and back sections of the bimini. A 12’x14’ hard-top is pretty large compared to most sailboats, even catamarans.
The quality of Mark’s work always shows up in the details. These sheets needed to be carefully ground along the adjoining edges without breaking through to the honeycomb, so that they could be glassed together into their sections, an itchy, messy job.


Three layers of glass tape were used to join the shapes of each section. This was done on both sides, followed by a long process of fairing and sanding to make this look as much like a smooth, clean and contiguous surface as possible.


A rail was built using 1” PVC glassed along the outer edges that will serve as a handrail as well as a gutter for rain catchment (yay, we get to get rid of the Home Depot gutters). The trick here was how to curve PVC?! Well, a bit of patience and a heat gun would do it, but a test case showed it was hard to achieve a smooth curve around the front section. Mark had the idea to fill the tubes with sand to even-out the heat and loads and this worked brilliantly (removing sand when finished).


Fairing was slightly complicated by the fact that we needed to use Awlgrip epoxy products on the underside to make the chemical bond with Awlgrip paints and standard vinyl and poly ester products on the upper side to bond with the gelcoat that was used there.


It was about this time when Mark fell ill with a bad MRSA infection. After a week of worsening blisters on his arms and legs and fevers to go along with the rash, we quickly eliminated mosquito bites and resin sensitivity from the list of possibilities and got him on massive doses of antibiotics none too soon. At least this gave him a much needed week off, since he’d been working non-stop since we’d been hauled out.


After Mark was healed and fairing complete, we got the painter at Riverside Marine to spray the undersides of the three sections including the curved rails with Awlgrip paint for a professional finish. We chose “cloud white” as a color and decided on a semi-gloss finish rather than gloss or matte, to give it a cleaner look without being too bright and shiny. Reflective sunlight is everywhere on a boat and can be draining on the eyes. The soft-top actually let in some light itself even though it was covered significantly with solar panels, so we’ll have to see if this hard-top is more protective or harsher than the soft-top in practice.

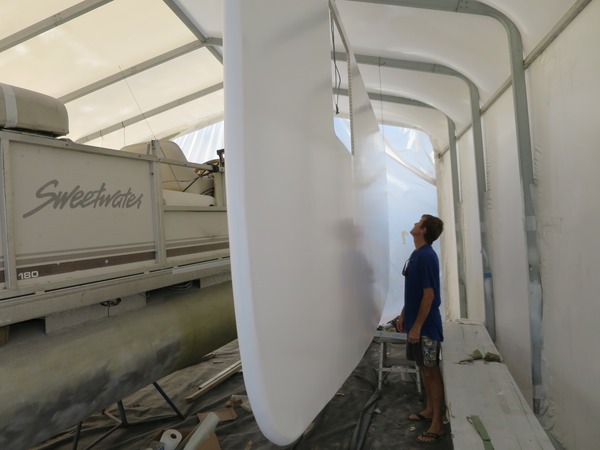

Finally, the three sections were raised up on top with a halyard and some help from the yard guys. The aluminum bimini had 3M double-sided tape laid down (red strips below) around the outer structure and cross-beams for placement and to create a weather seal.


The topside seams of the three sections were then sanded and glassed together to complete the 12’x14’ hard-top. Recall that the underneath seam of these three sections fall on a cross-beam, so those seams are now taped down and not visible from the cockpit.

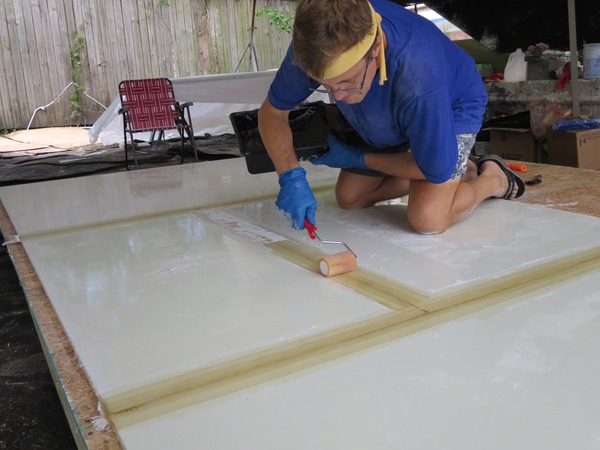
The upper-side of the hard-top was then coated with fumed silica-thickened gelcoat using a roller to give a stippled surface. We’d used this to create non-skid sections on our previous boat and knew decidedly that it was a good solution for a safe, non-skid surface to walk on for this purpose. It will be novel for us to be able to walk around this hard-top rather than a narrow walk-way.


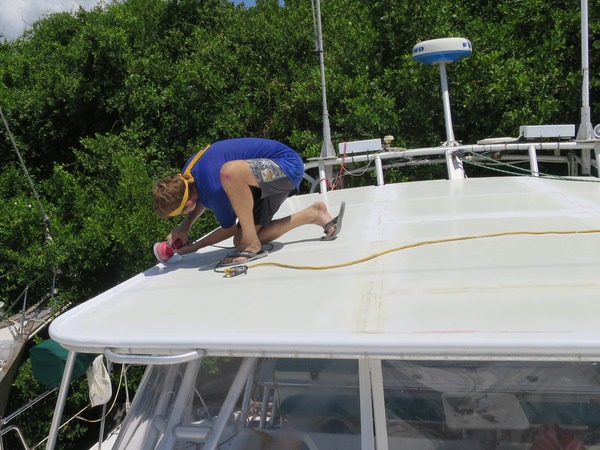
The final attachment of the hard-top to the aluminum structure required tap and screw of some 50+ machine screws all around the metal framework. It also required careful installation of screws with caulking and anti-seize to keep everything waterproof. Even after all of the above, a laborious undertaking.

The investment for this DIY hard-top was still significant with all of the costs of supplies, glass and paints totaling around $2200 (excluding the false start) and $500 for the spray paint job. It is hard to say whether a commissioned hard-top would fall in this same price range or be significantly more? In the end, we calculated that the finished hard-top came in at ~140 lbs.
Hatch and solar panels re-installed, we now have a permanent hard-top that is our weather protection, shade, water catchment, solar panel base and walkway! From our current perspective on the hard, it turned out fantastic and refreshes the look of the cockpit.
